Why I Refuse To Upgrade My Canon 60D

1233413_533520603385700_217048726_n.jpg

This may be a bit ranty but I feel the need to express the feelings I have towards this incessant need for filmmakers to continuously crave the "best-of-the-best" cameras for their next project. And this will also justify my complete comfort in still using a Canon 60D (a cropped sensor model DSLR that was released a few years ago) as my go-to camera. When RED launched their camera it was all anybody could talk about. There were filmmakers were little experience and also clients with zero knowledge who were insisting that to shoot on anything but a RED camera was not only foolish, it automatically meant your movie was not going to be the best it could be.

My Mom Bought Me A Red

The same effect was seen when DSLRs hit the scene, especially (and still to this day) with the Canon 5D Mk II or Mk III. When I arrived on set for a shoot recently with my 60D in hand, the other shooters who were armed with their 5D MkII full-frame cameras looked unimpressed and some even commented on my inability to get a full-frame camera.

If I could somehow post the video without singling out the people involved, I would happily challenge anyone to watch it and try to pick which angle was mine, the lone cropped-sensor camera amongst the full-frame big boys.

The school of thought that everything must be shot on the latest and greatest gear in order for it to be high quality goodness for the eyes and ears is ludicrous. Yes, there are amazing images captured on the RED, the Blackmagic and the Alexa. But does that mean that you can't shoot your picture on an inexpensive camera?

Ryan Connolly and the boys over at Film Riot proved this way of thinking wrong with a short film called Operation.

This tense short film was shot on an iPhone 4S. You can see how they achieved this from their BTS making-of video. The point of this example is that they pulled a high quality short film out of a smartphone.

Even on most features shot on RED it's not uncommon to see pick-up shots and second unit camera work being done with a DSLR (even a Rebel T2i, like a previous project I worked on). And it's very difficult to tell the difference between the two.

Long story short, when trying to choose a camera for your film it's not always smart to only settle for a high-end, Peter Jackson-level camera when you could just as easily be shooting with something more accessible. The focus shouldn't always be on the tool, rather than the artist wielding the tool. There are amazing movies shot on small cameras (smartphones, crop sensor DSLRs) and there are also really crappy movies shot on big cameras (RED, BM, Alexa). Whether you choose one over the other will not determine the outcome of your shoot. Only how you use it.

Will I shoot every project on my Canon 60D forever? Of course not. It is still important to keep up with technology as much as it is to stay well-practiced on technique. But only when the time is right and the wallet will allow.

Two CHEAP Tools That Every Cinematographer Should Have

Rarely do I impulse buy new toys for myself but I just couldn't resist with these two. Because they are both incredibly cheap AND looked to be very fun to play with. The Røde smartLav ($59.99, depending where you shop) and the KICK light from Rift Labs ($179) are two amazing tools that every shooter should have in their arsenal.

As videographers we all have to shoot talking heads every once in a while (interviews, not the band) and the ideal way to capture crisp audio for them is with a wireless lav. Decent mics can be mighty expensive to buy and renting all the time can be a hassle. Røde has created an inexpensive solution: a wireless lav that you plug into your iPhone or iPad that records quality audio.

You can use whatever audio recording program you like, but there are two Røde apps in the iTunes store (a free version and a Pro version for $5.99) that they recommend you use. Having just installed it I'm still getting familiar with it and have yet to try it out in the wild. When I do, I'll share the results. One downside that I see to this device is that you cannot monitor the audio as you're recording. So if you're ever using it for a VERY important interview you might be sweating bullets praying to god that it is capturing clean audio.

By far the coolest gadget here is the KICK light which is a deceptively small-yet-powerful LED light from Rift Labs. It is controlled through your iPhone via a free app that allows you to adjust the intensity, colour and behavior of the light remotely. This little sucker is powerful and versatile. It can be used even as a fill light for a fairly large scene. I used it the other day on set and will be asking for footage so that I can share the results.

5 Ways to Idiot-Proof Your Editing Project

Comp-1-0-00-00-00.jpg

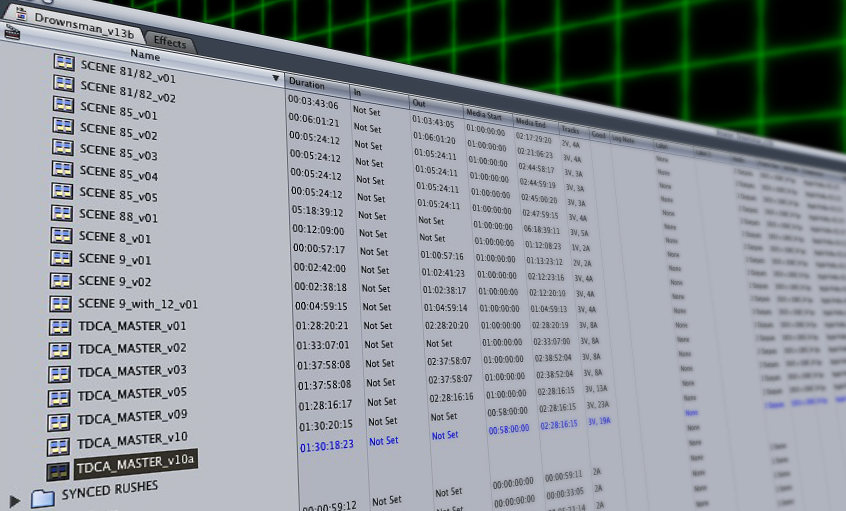
Continuing with the editing adventure that is The Drownsman, I thought it would be a good idea to communicate a valuable lesson that continues to get learned with each project: 1. Use version numbers for filenames, sequences, comps, etc.

Here's a secret: The sequence you start editing first is NOT the one you will be delivering. There will be changes. Lots of them. Decided on by you and also those requested by the client. So future-proof your work so that you can easily go back a few steps if you have to. Let's say you edit a montage sequence (labelled v01), the client asks for changes which you eagerly make for them, then they change their mind and decide they preferred it the way it was before. Uh-oh. When you made the changes did you duplicate the sequence first and start working on a new version (v02) and save your previous work?

Plus, there's another reason to use different version of project files: have you ever had your project file get corrupted? One day it just decides to not open and it's now beyond saving? But you didn't do anything wrong! But if you regularly duplicate the project file itself and start a new version of it, you may then have a series of backups that you can fall back on.

Oh, and when you submit your finished video to the client and they see that it's up to v26, they'll see just how busy you've been making changes for them.

2. Organize your bins

Imagine you're locking this project file in a capsule to be opened by some stranger in the distant future. If they were to open it up and look at it, will they be able to make sense of it? If this project is staying with you, then that future stranger could be you looking back into your archives for that important edit that you need to return to for some reason. Maybe a client you've done work for for years wants to assemble a montage of all videos in the past 5 years for an anniversary event. Or maybe you can use some work that you've done in a previous edit for a current one.

If this project is being handed over to someone else at any point, then you want them to appreciate the great job you've done organizing it and making it so easy for them to make sense of. Files are organized, folders are used and labelled properly, they don't have to hunt for missing elements or decipher your cryptic filenaming system that only you understand. It's like telling your friend to go into your garage and find the doohickey. Will your friend be able to make sense of your garage or will it be an utter mess that they'll be forced to search through?

The lesson here: If the project ever has to be opened again by anyone, including you, make it easy for the editor to understand the project setup and get to work sooner.

3. Use common sense when assigning names

When giving a name to a sequence, keep it simple. Not so simple as in "Sequence 1", "Sequence 2", etc. But clearly mark it for what it is: "Avatar2_DirectorsCut_MasterSequence_v03", "SpaceSharks_Scene4a_TOCOLOUR_v05", "TerminatorMeetsFrankenstein_TeaserTrailer2_v01". Or if it's an element being used for a larger project, for instance: "CircleOfMedia_InternetPromo_AnimatedLogo_v01". By reading it you know exactly what it is. Simple.

4. To transcode or keep it Raw?

This goes with the next point, but are you going to transcode footage and edit from proxy files? Or will you be keeping all of the files in their native format (you might only do this if you're working with RAW footage like from a RED Epic camera)? If you're combining different types of footage from different cameras, some transcoding will likely have to take place. Sure, you COULD get away with not transcoding so all video files are the same type, but that's just messy and leads to extra render time later. If the colourist or VFX supervisor wants Raw footage to work with (and they will) then you might edit with Raw footage to get the project to them easier. Or if you're doing all of post yourself, then maybe it will make your life easier.

5. Create a roadmap for the journey

When you leave to go for a drive to get something to eat, do you hop into your car and just start driving expecting that you'll get to a place that serves food eventually just through the act of driving? Of course not. You think of where you'd like to end up and then make a plan for getting there. Setting up your project file before you start out editing should be no different. Think of where you're starting (What type of footage are you dealing with?), where you're going (What format is this project to be delivered in? Is this for screening in a cinema or festivals? Is this going to a distribution company with their own set of delivery specs to adhere to? Is it going online on a YouTube channel?) and what points do you need to pass along the way (Does the project need to be handed to a colour lab, VFX facility or audio post studio? How will the client like to view progress, separate scenes or a full edit sequence?).

These are all important things to know before starting your project. Once after finishing a lengthy edit project and getting ready to send it to an audio studio I realized that I had edited the sequence with mixdown tracks only, not with the individual mic tracks. The studio would not accept this to work with. This meant I had to spend an entire day going through and replacing each and every audio track one-by-one. All because I didn't think of where the sequence was going once I was done cutting. A mistake on my part, but not one I'll repeat again.